Showing posts with label blocking. Show all posts

Thursday, January 7, 2010

A good day to write a blog post....

....because this is the view out my front door:


I apologize for the photo quality - I am having issues with my camera.
For example, even after consulting my photographer daughter I couldn't figure out how to deal with all the whiteness of snow.

The next two photos were taken with my camera phone because that day I couldn't get the digital camera to work at all and I needed to get these gifts wrapped.


Katie's Scarves
Two scarves for Katie (son's very sweet girlfriend):
First is another pompom (
Gnocchi by Lana Grossa) scarf in turqoise;


Second is a scarf knit in fisherman's rib with a ruffle at the edge. The yarn is Kollage's Glisten (although you can't see the 'glisten' in this photo) purchased at Kirkwood Knittery.


During my last blog photoshoot I managed to break the tripod, so the rest of these photos are not as clear as they could have been and obviously it's too snowy and cold outside to shoot in natural light.


Isager's "The Fan"
This is Marianne Isager's "Viften [the Fan]" from Japanese Inspired Knits

This sweater is knit in Southwest Trading Company's "Optimum DK"purchased from Flying Fingers. Other than the sleeves being way too long it was a satisfying project and a sweater that I might actually wear.


Rona Lace Shawl

Next up is "Rona Lace Shawl" by Anna Marie Jensen, knit in Jade Sapphire Lacey Lamb from Kirkwood Knittery.
I really like knitting with this yarn although I had to take care not to snag it, especially withe tiny crochet hook that I used for beading.


The yarn is really fine and I'm a loose knitter so I used a Size 4 needle even though the pattern called for Size 5 for a 52" diameter shawl. I admit that I didn't swatch. It was a fun knit and the first shawl I have done that I added beads. It is gorgeous; however - it seems too small even though it blocked to 56" before I unpinned it, which is larger than noted in the pattern. I plan to undo the bind off and enlarge it somehow, there is plenty of yarn left on the second skein.


A gift for me...
I received a lovely pair of hand knit mittens from Fran and she even knit them in my favorite color: Pink. Luckily she takes better photos than I do (photo swiped from Fran's blog).

Barb and I modelling our new mittens:


Saturday, June 13, 2009

Finished Objects....

Shetland Tea Shawl
pattern by Dale Long
Published in "
A Gathering of Lace"
Yarn: Alpaca With a Twist Fino, 2 skeins


Blocking:   


Finished:


Arch-shaped socks 
pattern by Jen Showalter
Yarn: Regia Design Line Kaffe Fassett
Based on this pattern, but worked toe up.

It is really difficult to take a photo of your own feet!


Handkerchief for Daughter's Wedding Day
Godmother's Edging from Treasury of Knitting Patterns

Yarn is 2/28 cashmere from Colourmart.


Embroidery design from old heirloom sewing/shadow embroidery patterns in my collection.


Fabric repurposed linen from a ribbon embroidery project that I never finished.
Sequins and beads are bridal alterations leftovers.

Daughter has decided that she will not actually soil this hankie as then
she would have to BLOCK IT (OMG).


Wedding Veil for Daughter
Veils at the bridal salons start at well over $100, plus my daughter wants to wear her veil vertically to complement the planned french twist hairdo.


So it was decided that Mom would try to make one.


This was so easy, and cost about $10.

Two yards of 72" wide tulle folded in half, then in half again.


Cut a 36" 1/4 circle with very sharp scissors, then cut another circle 3" radius from center point.


Unfolded, pressed, folded in half, ran two rows of stitching 1/4" and 3/8" from edger of inner circle.


Tied threads at one end, pulled up bobbin threads from other end, until edge was about 3/4" long gathered.
Sewed a piece of ribbon over the rough edge.

Once we have tried the veil on with the dress I will permanently attach it and the trim with a glue gun to the comb.


Note:
This morning I posted the Hexagon Scarf pattern to my Ravelry Store.


It is priced at $2.50 and can be purchased through Paypal even if you are not a member of Ravelry. Just click the "Buy Now" button on my sidebar, this will take you to Paypal where you can purchase the pattern to download.


I had a hard time getting this to post and format correctly today, therefore....


Note to self: Do all Blogdrive editing from Internet Explorer, not from Google.

Friday, May 8, 2009

Lerwick is Finished!

Blocking..........


Done Done Done ...................


By: Sharon Miller
Yarn: Wool/Silk from Colourmart
Worked on Size 1 U.S. 24" needle

The book is $43.00 plus shipping from Schoolhouse Press.
I will sell this book for $30.00, there are no marks in it, contact me if interested.

Sunday, November 23, 2008

Finished Shetland Shawl, etc.

The Flower Scarf pattern has been downloaded over 1,000 times and there are 51 Flower Scarf projects on Ravelry -- that is amazing to me.

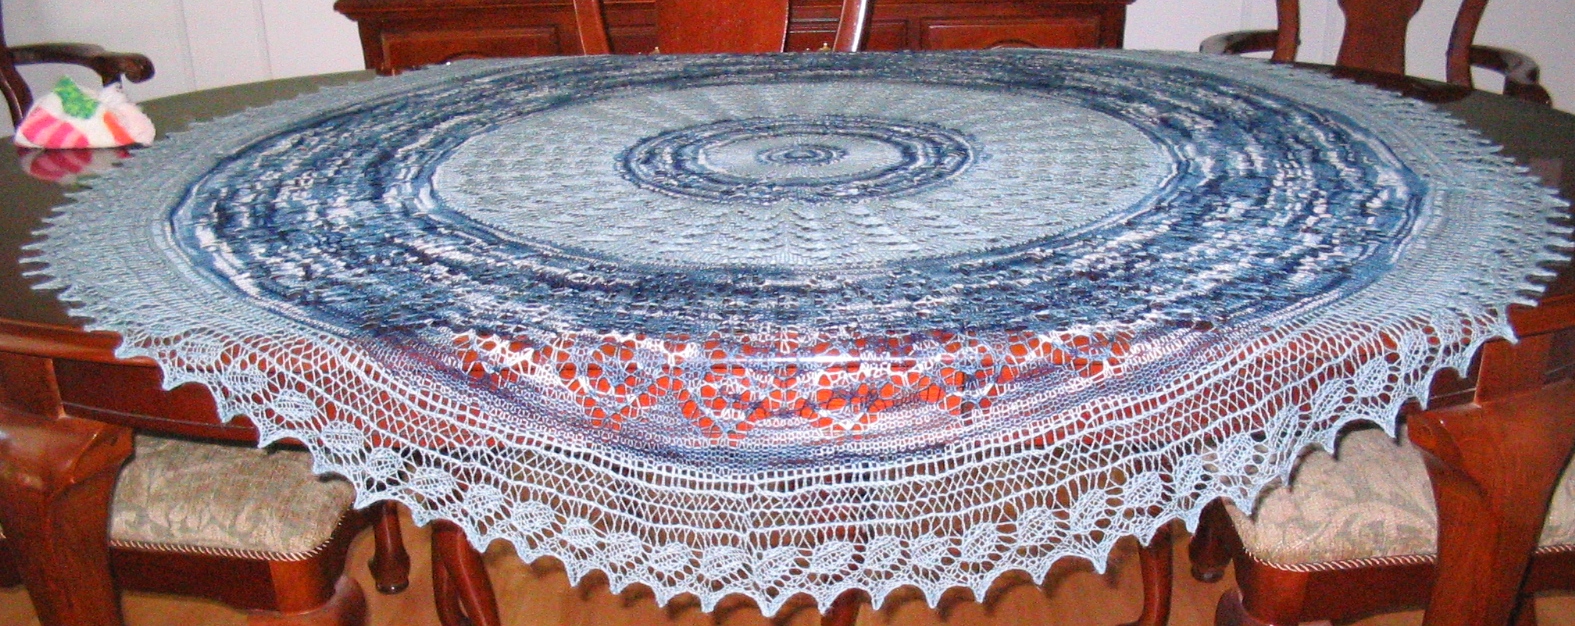
Joann made a second Woven Diamonds Faroese:


The shetland style shawl is finished. Why did I call it 'shetland style'?  I began with a cast of one stitch for the center section, increased one stitch every row until the center square reached it's full diagonal width, decreased one stitch every row until 1 stitch remained; picked up stitches all around the square placing markers at each corner and knit the first border, the second border and finally the edging increasing at each side of the four corner stitches every other row.

As I wrote in an earlier post I couldn't decide on an edging for this shawl.  Most of the other shawls I have made have a sideways edging (this type of edging is knit perpendicular to the body of the shawl and attached to the live shawl stitches once for every two edging rows).  A sideways edging is very stretchy since there is no bind off; ideal for a shawl. However, it takes a very long time to work even if it's fairly narrow.  I was getting tired of working on this shawl and decided that in this case it would be nice to work an edging that could be bound off.

Also, since the center and first border stitch patterns are very angular, I felt that the rest of the stitch patterns needed to be more rounded/softer so I settled on four repeats of Horseshoe lace from First Treasury of Knitting Patterns as a second border.   Then I chose a simple edging from Knitted Lace of Estonia that I worked for eight rows before binding off.

I've been forever looking for a good looking loose bind off option.

I've read in several places on the internet that the following is a stretchy bind off:

'*knit two together through the back loop, place resulting stitch on left hand needle, repeat from *'

But I don't find that to be stretchy at all; every two stitches are being reduced to one stitch making it even less stretchy than a regular (knit two, pass the first stitch over, knit the next stitch, repeat) bind off.

I was excited to find the solution in Knitted Lace of Estonia, the bind off above needs one step added in order to be stretchy....like this:

knit 1, place stitch back on left hand needle, knit two together through the back loop,
*knit the next stitch, knit this stitch and the previous stitch together through the back loop; 
repeat from *.

Also I modified it a little by substituting 'knit 1 through the back loop' rather than 'knit 1' which seemed to lay a little flatter.

It took nearly two hours to bind off approximately 600 stitches but even so the whole procedure took less time than a sideways border.

Deborah (Rogue Knit on Ravelry) is an awesome lace knitter and her knitting is gorgeous.  She thinks the key is in the blocking (she is an excellent knitter to begin with but careful blocking does make a huge difference in the look of the finished lace).  Deborah wrote a most informative post on her blog about her method of blocking and since I was just about out of Eucalan, I took a short drive to the nearest Walgreens (what is it with Walgreens anyway - there are six of them in the City of O'Fallon which has a population of 76,000) and bought the Pantene (even had a dollar off coupon).  It certainly smelled better than woolwash.


The shawl measures about 50" square and could have been a bit larger, but it's close enough. I'm pleased with how it turned out although I'm not in love with it yet - it takes a while until I love my finished objects - I know that I am my own worst critic, but I think that after spending so much time on a project I'm tired of it and need some distance before I can go back with a less critical eye and think 'that's really nice - did I 
actually do that?'


Monday, October 20, 2008

Finished Faroese shawls, Blocking shawls, a Cabled Tam Design

Regina (Rubicon on Ravelry) finished her Woven Diamonds Faroese...I think it turned out stunning!

She made a couple modifications to the pattern, if you are on Ravelry her notes are here:
Rubicon's Woven Diamonds Faroese.


I failed to show a photo of Fran's Woven Diamond Faroese. Fran was the first one to work the pattern - as a matter of fact she was the one who admired my blue one and encouraged me to write it up.

You can see Fran's shawl on her blog here:
Fran's Woven Diamonds Faroese

As I mentioned in an earlier post, I am working on a shetland style shawl design in Jojoland fingering weight wool. I have yet to find just the right edging so I have put this project on hold as I await Nancy Bush's new book, " Knitted Lace of Estonia " I'm hoping that there may contain an edging that will work or a stitch pattern that will inspire me to create an edging. In the meantime I blocked the shawl to see how the size is working out and to determine how wide the edging needs to be.


I used to block my shawls on towels laid over the carpet in the spare bedroom (which was once my sewing room and has since become the stash room). However, we have a little Yorkie named Buddy....


who was making a mess of the carpet when no one was looking and had to pull it up.

When we did that I could see that I wasn't helping the situation by blocking on it. Sometimes I spray my shawls with water to re-dampen them once they are pinned out, and that was also leaving water stains on the carpet backing.
Recently I found some interlocking mats at Big Lots (I also saw the same ones at Tuesday Morning).

I bought two sets at a very reasonable price. They seem to work great for blocking, I can pin into them and still shift the whole surface around if I need to. The wrong side of the mats is smooth. They did have a very strong rubber smell when I first opened the package but that seems to have dissipated.

Last year I took a fair isle hat class at Kirkwood Knittery taught by Brooke Nico.

I wasn't too fond of the result on my first attempt, so that that first hat lives at the shop. I had much better luck with my second design and also made matching fingerless gloves (background is brown shetland wool and the patterning consists of many different pieces of leftover variegated sock yarns).  Not one to wear hats, I found that I really liked the way this one looked and it didn't smash my hair too badly.

To block this tam none of my plates were the right size (of course not); instead I made a 10" diameter circle out of cardboard and covered it with plastic wrap.  Stretching the tam over the cardboard form, I threaded a piece of waste yarn through the edge of the ribbing (this works great if the edge is worked with a tubular cast-on) and drew it up into a small circle.  This was much better than using pins to keep the hat on the form while it blocked.


The last few weeks I've had an idea for a cabled tam inspired by the celtic cables in Viking Patterns for Knitting by Elizabeth Lavold and the patterns charted by the girl from auntie for her awesome designs.


I worked a few swatches and a prototype just to see how cables might work:


    I bought a skein of Classic Elite's Alpaca Sox at Knit and Caboodle to use for the actual tam in a soft gray color. Next I worked a portion of the stitch pattern as a fingerless glove to determine the gauge. Then I played with the stitch pattern in excel for many hours to decide on the best way to work it. Finally I cast on and knit, this is the result:


    It didn't turn out exactly as I'd pictured it, still deciding if I ought to publish it or not - leave a comment and let me know what you think.

    About Me

    My photo
    Missouri
    Knitting is magical!